
Have you ever wanted to create your own website but felt overwhelmed by all the technical terms? You’re not alone. Many people think building a website requires advanced coding skills or expensive software. The truth is, you can build a simple, professional-looking website today — even if you’ve never written a single line of code.
In this complete beginner guide, I’ll walk you through everything you need to know to create your first website from scratch. We’ll keep things simple, practical, and free whenever possible. By the end, you’ll have a live website you can share with friends, family, or potential clients.
### Why Build a Website Yourself?
Before we dive into the steps, let’s quickly cover why learning this skill is valuable:
- You gain full control over how your site looks and works.
- You save money compared to hiring a developer.
- You understand the basics of the web, which helps if you later want to use website builders or learn more advanced skills.
- It’s a great foundation if you ever want to move into web development as a career or side hustle.
Ready? Let’s start.
### What You’ll Need
You only need three basic things:
1. A computer (Windows, Mac, or even a Chromebook works).
2. A free text editor (I’ll recommend one below).
3. An internet connection to publish your site later.
That’s it. No expensive software required.
### Step 1: Understand the Three Core Languages
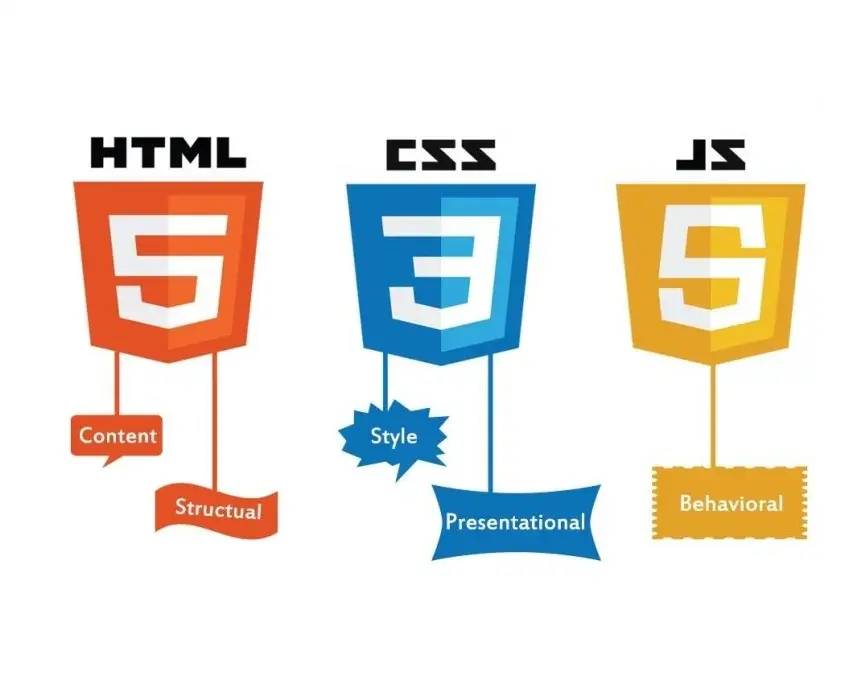
Every website is built with three main technologies:
- **HTML** – The structure (like the skeleton of a house). It tells the browser what content to show: headings, paragraphs, images, links, etc.
- **CSS** – The design (like the paint, furniture, and decorations). It controls colors, fonts, spacing, and layout.
- **JavaScript** – The interactivity (like the electricity and moving parts). It makes buttons work, adds animations, and handles user actions.
For your first website, we’ll focus mainly on HTML and CSS. JavaScript can come later.
### Step 2: Set Up Your Tools
The easiest free text editor for beginners is **Visual Studio Code** (often called VS Code). It’s free, powerful, and used by professional developers.
1. Go to [code.visualstudio.com](https://code.visualstudio.com) and download it for your computer.
2. Install and open it.
3. Create a new folder on your computer called something like “MyFirstWebsite”.
4. Inside VS Code, open that folder (File → Open Folder).
Now create three files inside the folder:
- `index.html` (this will be your main page)
- `style.css` (for your design)
- `script.js` (we’ll leave this empty for now)
### Step 3: Write Your First HTML
Open the `index.html` file and paste this basic structure:
```html
<!DOCTYPE html>
<html lang="en">
<head>
<meta charset="UTF-8">
<meta name="viewport" content="width=device-width, initial-scale=1.0">
<title>My First Website</title>
<link rel="stylesheet" href="style.css">
</head>
<body>
<header>
<h1>Welcome to My Website</h1>
<nav>
<a href="#">Home</a>
<a href="#">About</a>
<a href="#">Contact</a>
</nav>
</header>
<main>
<section>
<h2>About Me</h2>
<p>Hi! This is my first website. I’m learning web development and this is just the beginning.</p>
</section>
<section>
<h2>What I Love</h2>
<ul>
<li>Learning new skills</li>
<li>Building things</li>
<li>Sharing knowledge</li>
</ul>
</section>
</main>
<footer>
<p>© 2026 My First Website. All rights reserved.</p>
</footer>
<script src="script.js"></script>
</body>
</html>
```
Save the file. Right-click the `index.html` file in VS Code and choose “Open with Live Server” (you may need to install the free Live Server extension first). Your website will open in the browser!
### Step 4: Style It with CSS
Open `style.css` and add some basic design:
```css
* {
margin: 0;
padding: 0;
box-sizing: border-box;
}
body {
font-family: Arial, sans-serif;
line-height: 1.6;
color: #333;
background-color: #f4f4f4;
}
header {
background-color: #2c3e50;
color: white;
padding: 1rem 2rem;
text-align: center;
}
nav a {
color: white;
margin: 0 15px;
text-decoration: none;
}
nav a:hover {
text-decoration: underline;
}
main {
max-width: 800px;
margin: 2rem auto;
padding: 0 1rem;
}
section {
background: white;
padding: 1.5rem;
margin-bottom: 1.5rem;
border-radius: 8px;
box-shadow: 0 2px 5px rgba(0,0,0,0.1);
}
h2 {
color: #2c3e50;
margin-bottom: 0.8rem;
}
footer {
text-align: center;
padding: 1.5rem;
background-color: #2c3e50;
color: white;
margin-top: 2rem;
}
```
Refresh your browser. Your site should now look much cleaner and more professional.
### Step 5: Add Real Content and Improve It
Replace the placeholder text with your own information. Add:
- A short introduction about yourself
- A list of your interests or skills
- A simple contact section (you can add an email link)
Example contact link:
```html
<p>Email me at: <a href="mailto:yourname@email.com">yourname@email.com</a></p>
```
### Step 6: Make It Look Better on Mobile
The code we used already includes a viewport meta tag, which helps on phones. Later you can learn media queries to make the layout even better on small screens, but for now your site is already usable on mobile.
### Step 7: Publish Your Website for Free
Once you’re happy with how it looks, it’s time to put it online so anyone can visit it.
The easiest free options for beginners are:
- **Netlify** – Drag and drop your folder and get a free live link in seconds.
- **GitHub Pages** – Great if you want to learn a bit of Git later.
- **Vercel** – Another excellent free hosting platform.
For the absolute simplest method right now:
1. Go to [netlify.com](https://www.netlify.com) and sign up for free.
2. Drag your entire project folder onto their dashboard.
3. Netlify will give you a live link (something like `your-site-name.netlify.app`).
Congratulations — your website is now live on the internet!
### Common Beginner Mistakes to Avoid
- Forgetting to save files before refreshing the browser
- Using spaces or special characters in file names (stick to lowercase and hyphens)
- Not linking the CSS file correctly (`href="style.css"`)
- Expecting the site to look perfect on the first try (it rarely does)
### What to Do Next
Once your first site is live, try these small improvements:
- Add real images (use free sites like Unsplash)
- Create a second page (about.html) and link to it
- Experiment with different colors and fonts
- Learn basic JavaScript to add a simple button that changes text
### Final Thoughts
Building your first website is one of the most satisfying feelings in tech. You started with nothing and now have something real that exists on the internet. That’s a big achievement.
Don’t worry if everything isn’t perfect yet. Every professional developer started exactly where you are now. The key is to keep practicing and building small projects.
You’ve just taken the first real step into web development. Well done.

Leave a comment
Your email address will not be published. Required fields are marked *